Cross-Section Microscopy Analysis of Exterior Paints: Bracken Tenement (Block 2, Building 52), Williamsburg, Virginia
Colonial Williamsburg Foundation Library
Research Report Series - 1736
Colonial Williamsburg Foundation
Library
Williamsburg, Virginia
2012
Cross-Section Microscopy Analysis of Exterior Paints
Bracken Tenement
(Block 2, Building 52)
Williamsburg, Virginia
Table of Contents
| Purpose | 1 |
| Sampling Procedures | 2 |
| Results of Cross-Section Analysis | 3 |
| Results of Binding Media Analysis with Fluorochrome Stains | 10 |
| Results of Pigment Identification | 12 |
| Results of Color Measurement | 13 |
| Conclusion | 14 |
| Appendix | |
| Sampling Memorandum | 15 |
| Cross-Section Preparation Procedures | 16 |
| Binding Media Analysis Procedures | 16 |
| Pigment Identification Procedures | 16 |
| Color Measurement Procedures | 17 |
| Contact Sheets of Cross-Section Photomicrographs | 18 |
Cross-Section Microscopy Analysis of Exterior Paints
| Structure: | Bracken Tenement, Colonial Williamsburg Foundation |
|---|---|
| Requested by: | Edward A. Chappell, Director, Architectural Research Department |
| Funded by: | A Fidelity Foundation Grant to Colonial Williamsburg Foundation |
| Conservator: | Natasha K. Loeblich, Architectural Paint Analyst, Architectural Research Dept. |
| Consultant: | Susan L. Buck, Ph.D. Conservator and Paint Analyst |
| Date: | March 5, 2007 |
Purpose
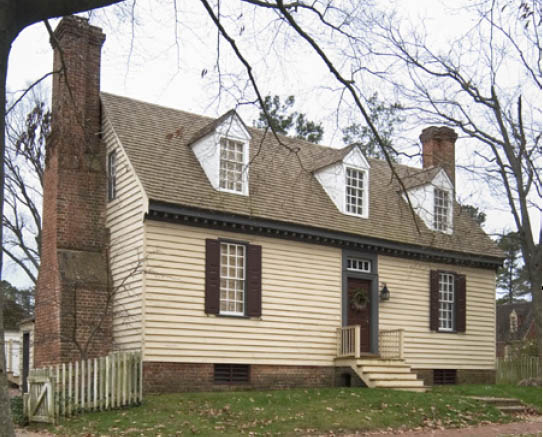
The goal of this project is to use cross-section microscopy to identify the early finishes, if they are present, on samples from the Bracken Tenement. Edward Chappell took these exterior samples from the cornice and windows on August 25, 2006. In 2004 Architectural Historian Carl Lounsbury wrote a summary of the house as part of a "Buildings of Williamsburg" series on the internet.1 A portion of his summary is quoted below.
A one-story frame dwelling standing on the south side of Francis Street, the Bracken Tenement is typical of the residences erected by prosperous merchants, craftsmen, and public officials in Williamsburg at the end of the colonial period. Little is known about the history of the house. The destruction of Williamsburg municipal records and James City County court records during the Civil War has made it difficult to establish the original owner or the date of its construction. The structure appears on the Frenchman's Map of Williamsburg made at the end of the Revolutionary War. Documentary evidence indicates that it was owned but not occupied by the Reverend John Bracken from the mid 1780s through the first decade of the nineteenth century. Bracken served as minister of Bruton Parish Church, mayor of Williamsburg in 1800, and President of the College of William and Mary from 1812 to 1814. In terms of its plan, brickwork, and surviving architectural woodwork, the building could well have been built in the third quarter of the eighteenth century. The house was one of the first buildings restored by Colonial Williamsburg in 1928, was slightly altered in 1951, and began serving as a guest house for the Williamsburg Inn in 1972. Minor renovations were made to the house in 1999.
…Also surviving from the colonial period is the modillion cornice on the front façade, giving the building a decorative touch indicative of its relative importance despite its history as a rental property in the last quarter of the eighteenth century. Although modest by modern standards, the house stood head and shoulders above those occupied by most Virginians in the colonial and early national periods.
Sampling Procedure
Ten samples were taken from the windows and cornice on the north and south elevation of the house. The samples were lifted with an X-acto blade by Chappell and collected on site in labeled paper envelopes and each was given a unique number corresponding to the recorded sample locations. The exact sample locations are:
| BT1 | N cornice, 13th modillion, counting from W end, W side, cymatium fillet at joint with rear cymatium |
| BT2 | N cornice, rear cymatium fillet midway between 15th and 16th modillions, from W end |
| BT3 | N cornice, bed molding, bottom edge, centered between 14th and 15th modillions, from W end |
| BT4 | N cornice, fascia behind modillions, 1" E of 12th modillion, from W end, immediately below cymatium |
| BT5 | N cornice, middle of fascia behind modillions, against W edge of 11th modillion from W end |
| BT6 | N cornice, bed molding, bottom cyma, top fillet, centered between 9th and 10th modillions, from W end |
| BT7 | N cornice, rear cymatium fillet, at intersection with 10th modillion, from W end |
| BT8 | N wall, W 1st floor window, E jamb, behind backband and 2" below meeting rail |
| BT9 | N wall, W 1st floor window, E jamb, behind backband and immediately below meeting rail |
| BT10 | S wall, E window, W jamb behind backband 2" above meeting rail |
Results of Cross-section Analysis
In general, samples from the cornice and windows suggest that these two elements were often painted the same color. Sample from elements yielded evidence that the first generation of finish was a dark gray paint. This suggests that the cornice and some of the windows date to the same period. A table with the full stratigraphy of both elements is included below.
| Cornice Paints | Window Paints | Date | |
|---|---|---|---|
| 18 | - | Gray paint, applied in two coats | Modern |
| 17 | - | Gray paint, applied in two coats | Modern |
| 16 | Gray paint, applied in two coats | Gray paint, applied in two coats | Modern |
| 15 | Gray paint, applied in two coats | Gray paint, white base coat | Modern |
| 14 | Gray paint, white base coat | Gray paint, applied in two coats | Modern |
| 13 | Gray paint, applied in two coats | Gray paint, applied in two coats | Modern |
| 12 | Cream-colored paint | Cream-colored paint with grime above, applied in two coats | |
| 11 | Cream-colored paint with grime above, applied in two coats | Cream-colored paint with grime above, applied in two coats | |
| 10 | Cream-colored paint with grime above, applied in two coats | Cream-colored paint with grime above, applied in two coats | |
| 9 | Cream-colored paint, applied in two coats, dark in ultraviolet light | Cream-colored paint, applied in two coats, dark in ultraviolet light | 1845 or after |
| 8 | Cream-colored paint with zinc white, applied in two coats, discontinuous green paint above | Cream-colored paint with zinc white, applied in two coats, discontinuous green paint above | 1845 or after |
| 7 | Cream-colored paint with grime | Cream-colored paint with grime | |
| 6 | Cream-colored paint with grime, applied in two coats | Cream-colored paint with grime, with thin black | material below |
| 5 | - | Cream-colored paint with grime | |
| 4 | - | Yellow paint with grime | |
| 3 | Resinous layer? | Red paint | |
| 2 | Cream-colored paint with grime | Cream-colored paint with grime | Possibly 18th c. |
| 1 | Dark gray paint | Dark gray paint | Possibly 18th c. |
| Wood with sealant | Wood with sealant |
Three samples were taken from the exterior frame of two windows. The east window on the south face did not yield evidence of early paint suggesting that the surfaces of this window may have been stripped or sanded. The western first-floor window on the north face of the building, however, does have evidence of early finishes. The first sample from the north wall window was taken from the jamb below the meeting rail. Above the wood cells are the remains of the first generation of finish, a dark gray paint. Generation two is a cream-colored paint and generation three is missing on this sample. Generation four is a yellow paint with a bluish fluorescence in ultraviolet light. Generation five is a light-brown paint with grime above it. Above this are seven generations of cream-colored paints with variable autofluorescence characteristics. Generation eight has a sparkly appearance in ultraviolet light most likely due to the presence of zinc white pigment which would date this layer to 1845 or after. Most of these generations were applied in two layers and have an accumulation of grime on their exposed surfaces. There are also five generations of modern gray paints that are finely ground, unweathered, and nonfluorescent. Some of these modern generations were applied in two coats.
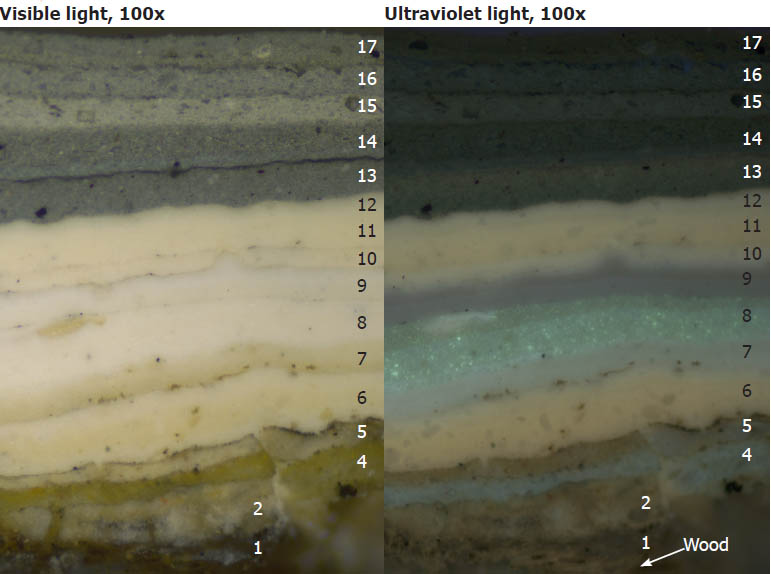 Sample BT8 from western first-floor window of north face
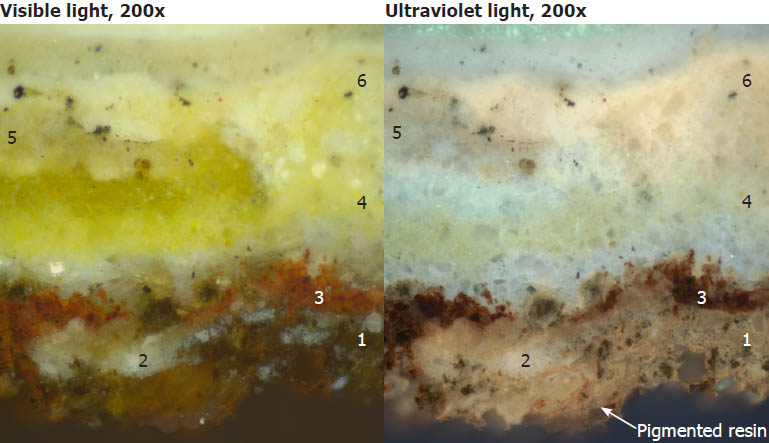
A second sample from the same west window on the north wall was taken from just below the meeting rail on the jamb. This sample is slightly different from the other sample taken from the same window, although it shares the same basic stratigraphy. It has a few extra layers that may have only survived in this sample because it is slightly more protected, having been sheltered by the meeting rail of the window.
Trapped in the wood cells of this sample is a resinous coating that appears to be sparsely pigmented with red pigments. This red pigmentation in the resinous coating is not found in any other sample and may be a contamination from another layer. Next are fragments of the first generation dark gray paint followed by the cream-colored paint of generation two. Generation three is a deep red paint that is dark in ultraviolet light and not found in any other samples. Generations four, five, and six are identical to those found in the other sample from this window.
 Sample BT9 from western first-floor window of north face
The sample from the protected area just under the meeting rail also has a thin dark layer between generations five and six. The layer appears to be too continuous to be merely grime, but is almost too thin to be a paint layer. The black material is dark in ultraviolet light and in visible light. It only appears in this one cross-section from this sample so may be a contaminant or a coating applied to the shutters.
 Sample BT9 from western first-floor window of north face
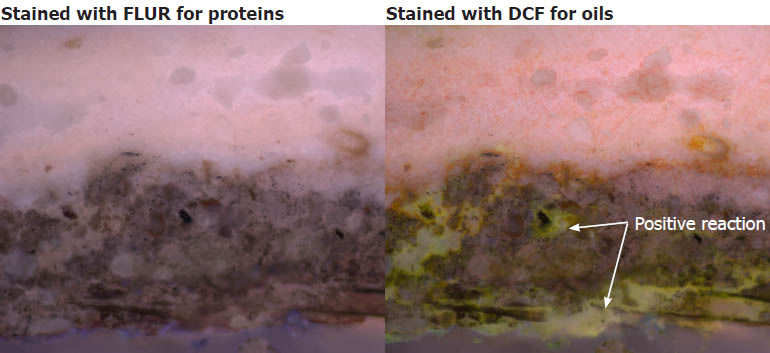
Another cross-section from this same window sample has a discontinuous layer of green paint between generations eight and nine. This same green layer was also found in a fragment from the sample from the east window on the south face and those cross-sections are shown at the bottom of this page. In both cases the green layer is directly above a paint layer with zinc white pigment that gives the layer a characteristic sparkly appearance in ultraviolet light. Since the zinc white layer must date to 1845 or after, this green paint must postdate that. The paint is finely ground and is pigmented with fine green pigment. Since this layer is discontinuous it may have been a paint applied to the shutters when they were being painted in situ.
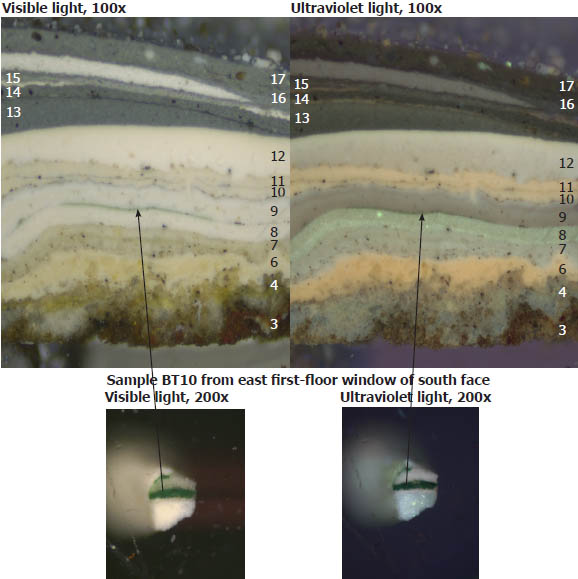 Sample BT9 from western first-floor window of north face
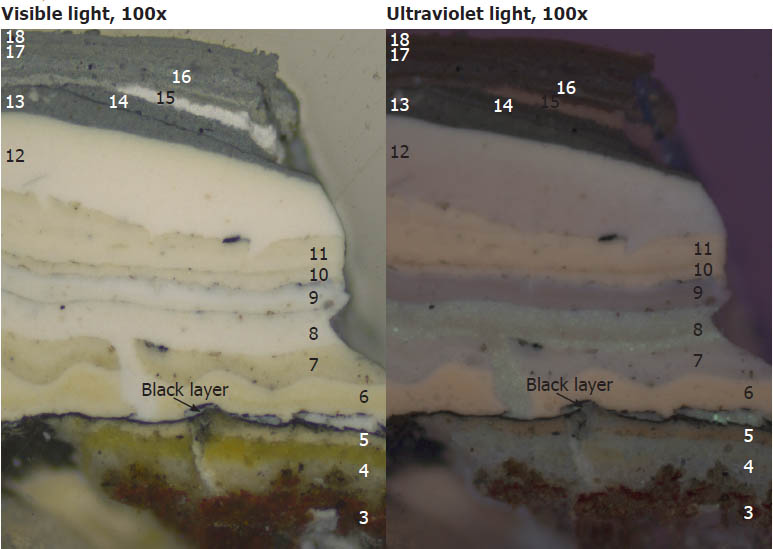
Seven samples were taken from areas of the cornice on the north face of the building. The images below are cross-sections from the bottom edge of the cornice bed molding. At the bottom of the cross-section is the wood substrate which has pockets of a resinous sealant trapped in the wood cells. This resin does not appear to have any red pigmentation. As with the windows samples, all of the samples from the cornice begin with a first generation of coarsely-ground, dark gray paint. The dark gray paint has some autofluorescence that is probably due to the presence of lead white pigment which has a characteristic bright autofluorescence. Generation two on the cornice is a cream-colored paint that is similar to the cream-colored paint in generation two on the windows though a bit darker in color. Many of the samples from the cornice are missing finish layers found on the windows. There is no evidence of generations three, four, or five from the window stratigraphy in any of the cornice samples. It may be that the cornice was not painted as often as the windows or that layers have been lost due to wear.
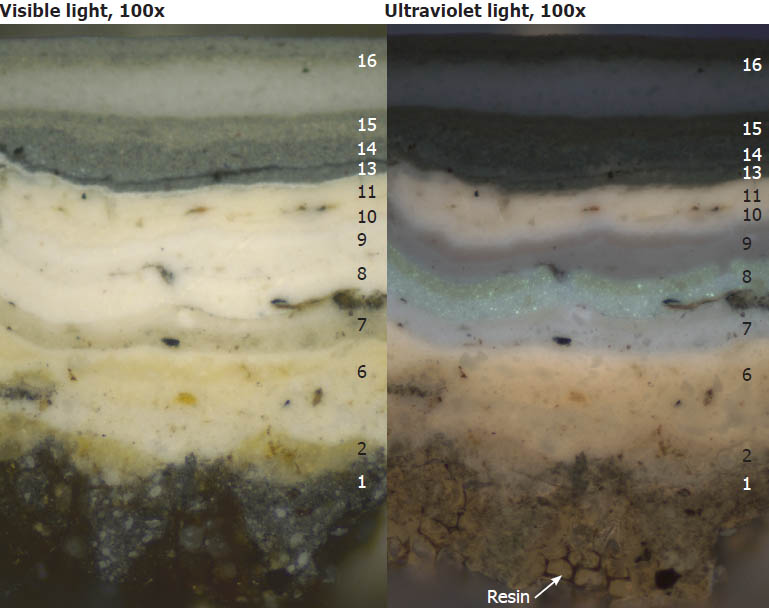 Sample BT3 from the bottom edge of the bed molding on the north face cornice
Some samples from the cornice seem to have a resinous, pigmented brown layer above the cream-colored paint of generation two. This resinous layer flowed under the dark-gray paint of generation one in places as is evident in the cross-section below. There is a separation between the resinous material and the cream-colored generation below it so it was applied as a discrete generation by itself.
 Sample BT3 from the bottom edge of the bed molding on the north face cornice
Results of Binding Media Analysis with Fluorochrome Stains
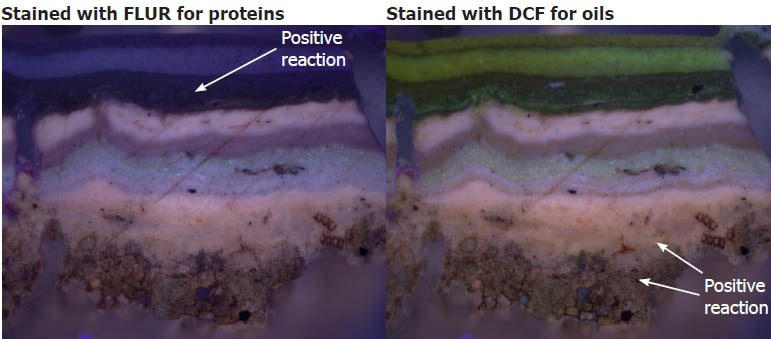
Several cross-sections were stained with three biological fluorochrome stains to detect the presence of carbohydrates, proteins, and oils in the paint binders. The cross-section shown below is from the cornice on the north face and is also shown on page four of this report. Several of the later layers showed a positive reaction for carbohydrates when stained with TTC, which has a dark red positive reaction color. The resinous sealant reacted positively for carbohydrates, as did the cream-colored paint in generation five. There was no noticeable reaction for proteins when stained with FLUR except in the upper modern layers which lightened slightly. The early layers, including the first generation dark gray paint, did react for oils when stained with DCF. The early layers turned slightly yellow which indicates the presence of aged, unsaturated oils. Several of the modern layers at the top of the cross-section also reacted for oils.
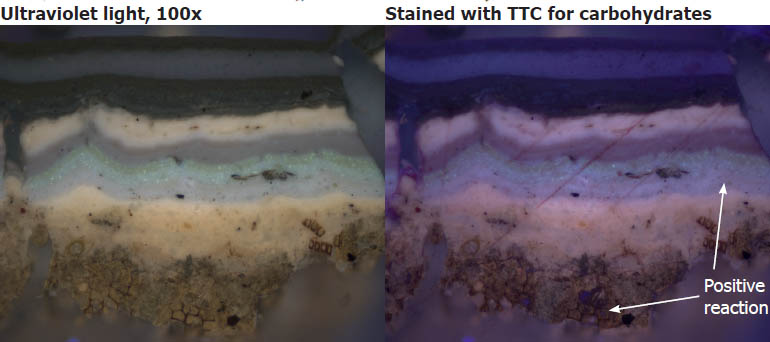 Sample BT3 from the bottom edge of the bed molding on the north face cornice
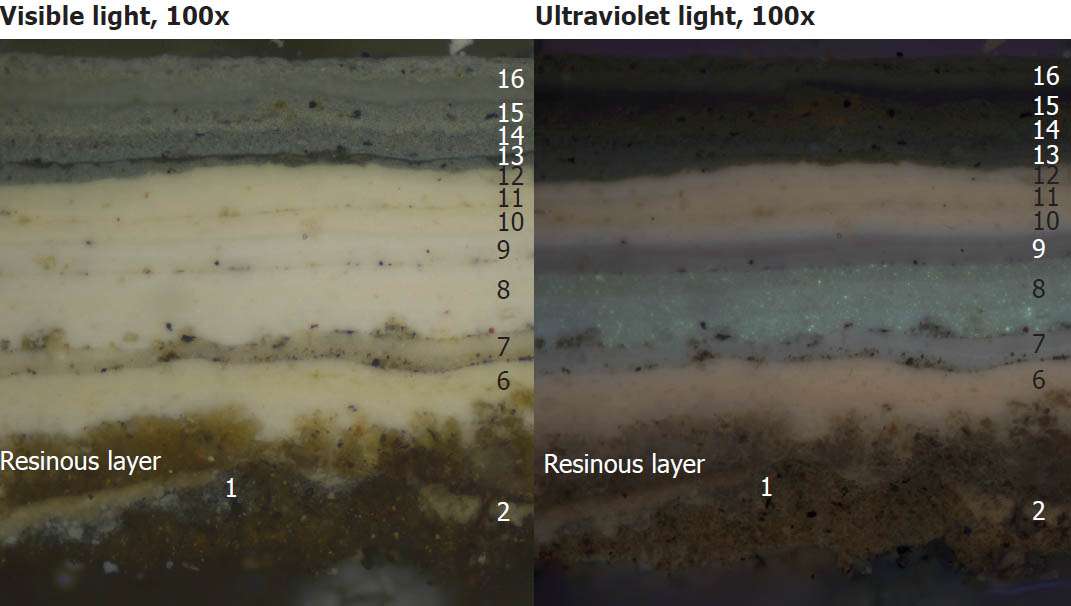
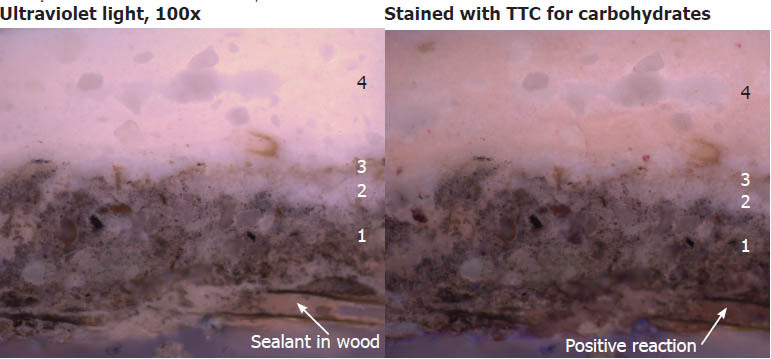
Another cross-section from the cornice on the north wall was also analyzed with fluorochrome stains. This cross-section is shown on page five of this report as well. Below are magnified images of the reactions of the early layers. There is a reaction for carbohydrates in the sealant in the wood and cream-colored paint of generation four. There is no visible reaction for proteins. The dark gray paint of generation one does show a clear reaction for aged, unsaturated oils. This suggests that the first generation paint is a oil paint which would have good durability for an exterior surface. Oil is the traditional binder for eighteenth and nineteenth-century exterior paints. Most likely, the oil is linseed oil, but further analytical work would need to be done to confirm this.
 Sample BT7 from the rear cymatium fillet on the north face cornice
Results of Pigment Identification
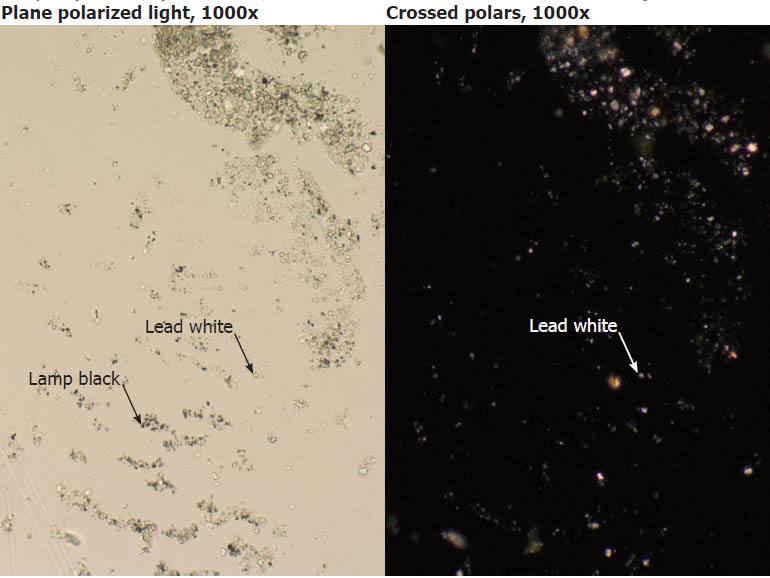
Pigment identification with polarized light microscopy was undertaken on the first generation dark gray paint layer. This target layer was scraped with a scalpel and the dispersed pigments were spread on a glass slide for examination. The dispersed pigments were compared to known pigments from a reference library and their optical and morphological properties were examined. The paint appears to be composed of lead white and lamp black pigments. The lead white pigments are large and rounded suggesting that this is a coarsely-ground, early paint. More modern production of lead white tends to produce much finer and more needlelike pigment particles. Both of these pigments were commonly used in the eighteenth century.
 BT2, dispersed pigment sample from first dark cream-colored paint layer
Results of Color Measurement
The CIE L*a*b* color system was used for color measurement in which L* represents lightness to darkness with 100 being the brightest, a* represents red to green with positive numbers being more red and negative numbers more green, and b* represents yellow to blue with positive numbers being more yellow and negative numbers more blue. A Munsell color system measurement is also given which has hue, value, and chroma coordinates. All color measurement were made using a Minolta Chromameter CR-241 microscope. Colors are compared to each other in this report using a ΔE formula that calculates the numerical difference between two values.
Eight samples were selected from uncast material from samples BT2, BT4, BT7, and BT8. Because the early paint is coarsely ground and weathered, its color is quite variable. Seven color measurements were taken from the uncast samples to get an average color value. The closest measurement to the average was taken from uncast material from sample BT2 so this color value was chosen for color matching. The dark gray paint from sample BT2 and has a color value of L* 26.41, a* -0.33, b* 1.86. This reading is different from the average by a ΔE value of only 1.47. Because of the variability and worn nature of the dark gray paint all the readings were fairly different from each other. The Munsell color system gives this paint a hue of 7.3Y, a value of 2.5, and a chroma of 0.0.
An good commercial match to the dark gray paint in sample BT2 is Pittsburgh Paints color 518-7 "Black Magic". This paint has a color value of L* 26.03, a* -0.01, b* 0.27 which is different from the dark gray paint in sample BT2 by a ΔE value of only 1.67. The current gray paint on the trim of the house was found to have a color value of L* 47.10, a* -0.82, b* -1.28 which is considerably brighter and more blue that the original paint or the commercial color match.
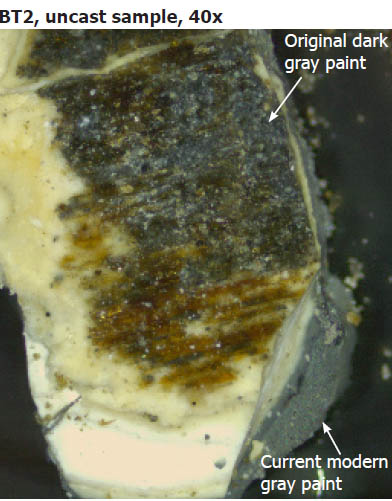 BT2, uncast sample, 40x
 Best match to original paint
Conclusion
All the samples from the cornice and the west window on the north elevation have evidence of a weathered and dirty first generation dark gray paint applied over a natural resin sealant. This similarity in paint treatments which suggests that these two elements have the same construction date. The dark gray paint is very coarsely ground, with large clumps of lead white and lamp black pigments. It reacted weakly for the presence of oils when fluorochrome stains were applied. Because this layer is so worn and thin, it seems likely that this paint was left on the wood for a significant amount of time and allowed to almost wear away. The worn surfaces and coarsely ground nature of the gray paint are consistent with the late eighteenth-century date of this house. A commercial paint color match was found that can be used in the future to repaint the house to more accurately represent the original color than the current gray paint color. However, any modern paint will be more uniform in composition that the original coarsely-ground paint.
Samples from the cornice generally share the same stratigraphy as the windows and in generation two both elements were painted cream color. The exceptions to this rule are generations three, four, and five which are missing on the cornice. This may indicate that the cornice was painted less often than the window, perhaps because it was exposed to less direct weathering Some samples from the cornice have a resinous layer in generation three applied perhaps for water-proofing, but the nature of this layer is unclear. The evidence in samples from the west window on the north elevation suggest that while the cornice remained cream-colored the windows were painted red, yellow, and then cream color again. After this many generations of cream-colored paint were applied to both the cornice and windows. In the modern period, several generations of dark gray paint have been applied. This gray is similar to the original color and must have been based on previous paint analysis.
There are discontinuous layers in some of the window samples that may have been paint or material applied to the shutters which dripped onto the window jambs. One cross-section from the west window on the north elevation has a thin black layer above generation five that seems to thin to be a paint. Samples from this window and the east window on the south wall both have evidence of discontinuous green paint above generation eight that might also be a shutter paint.
According to Chappell, no early weatherboards survive, so despite the fact that original finishes survive on the cornice and windows of the Bracken Tenement it is not possible to determine a complete color scheme for this building.
Footnotes
Appendix
Sampling Memorandum
August 25, 2006
To: Natasha Loeblich
From: Edward Chappell
Subject: Exterior Paint Samples - Bracken Tenement
Block 2, Building 52
Attached are paint samples I took this morning from exterior woodwork at the Bracken Tenement. The cornice appeared to offer the best material, but I sampled the window frames as the only other surviving early woodwork.
- 1.North cornice, 13th modillion, counting from west end, west side, cymatium fillet at joint with rear cymatium.
- 2.North cornice, rear cymatium fillet midway between 15th and 16th modillions, from west end.
- 3.North cornice, bed molding, bottom edge, centered between 14th and 15th modillions, from west end.
- 4.North cornice, fascia behind modillions, 1" east of 12th modillion, from west end, immediately below cymatium.
- 5.North cornice, middle of fascia behind modillions, against west edge of 11th modillion, from west end.
- 6.North cornice, bed molding, bottom cyma, top fillet, centered between 9th and 10th modillions, from west end.
- 7.North cornice, rear cymatium fillet, at intersection with 10th modillion, from west end.
- 8.North wall, west first-floor window, east jamb behind backband and 2" below meeting rail.
- 9.North wall, west first-floor window, east jamb behind backband and immediately below meeting rail.
- 10.South wall, east window, west jamb behind backband 2" above meeting rail.
E.A.C.
Cross-section Preparation Procedures
The samples were initially examined with a stereomicroscope under low power magnification (5 to 50 times magnification) and divided as needed. When possible, a portion of each sample was kept in reserve for future analysis and a portion cast in a labeled cube of a commercial two-part polyester resin manufactured by Excel Technologies, Inc. (Enfield, CT). The resin was cured under an incandescent lamp for several hours. The resin cubes were then ground on a motorized grinding wheel with 400 grit sandpaper to reveal the cross-sections. Final finishing was achieved using a Buehler Metaserv 2000 grinder polisher equipped with abrasive cloths from Micro Mesh, Inc. with grits of 1500 to 12,000.
Cross-section microscopy analysis was performed using a Nikon Eclipse 80i microscope equipped with an EXFO X-Cite 120 Fluorescence Illumination System fiberoptic halogen light source. The cross-sections were examined at magnifications of 40x, 100x, 200x, and 400x using reflected visible light and a UV-2A fluorescence filter cube with a 330-380nm excitation. The cross-sections were photographed digitally using an integral Spot Flex digital camera with Spot Advanced (v. 4.6) software. The light levels of the images were adjusted in Abode Photoshop (v. 6.0) when needed. The color in the digital images is indicative of the actual color of the paints, but cannot be used for color matching as the printing process can cause color shifts.
Under ultraviolet light many materials have characteristic autofluorescence colors that can suggest their composition. For example, most natural resin varnishes have a bright autofluorescence while an oil varnish will be dark in ultraviolet light. Visible light microscopy can also yield valuable information. The presence of soiling layers or weathering can indicate that the finish layer existed as a presentation surface for a period of time. Since many finishes make use of a build-up of layers, it is important to determine which layers were meant to be final presentation surfaces.
Binding Media Analysis Procedures
To better understand the composition of the paint binders, selected cross-sections were stained with biological fluorochrome stains to indicate the presence of carbohydrates, proteins, and oils in the paint binders. The stains used were FLUR (0.5% w/v fluorescamine in anhydrous acetone) which marks proteins blue-white, TTC (4% w/v triphenyl tetrazolium chloride in methanol) which marks carbohydrates red-brown, and DCF (0.2% w/v 2,7 dichlorofluorescein in ethanol) which marks saturated lipids pink and unsaturated lipids yellow.
Pigment Identification Procedures
Samples with good accumulations of early paints identified through cross-section microscopy analysis were scraped with a scalpel under magnification to reveal the target paint layer. A small amount of this layer was then scraped onto a glass microscope slide, dispersing the pigments. The dispersed pigments were permanently embedded under a cover slip in Cargille Meltmount (Cargille Labs., Cedar Grove, NJ). The Meltmount used has a refractive index of 1.662. The prepared slides were then examined under the microscope with transmitted visible light using a polarizing filter at a magnification of 1000x with an oil immersion objective. The morphological and optical properties of the pigment particles was observed and compared to reference pigment samples.
Color Measurement Procedures
Color measurements were made using uncast samples that were selected under magnification. All color measurements were made using a Minolta Chromameter CR-241 with a measurement area of 0.3mm for uncast samples and a measurement area of 1.8mm for paint swatches. This microscope has an internal, 360° pulsed xenon arc lamp and can measure color with five color systems. The color systems used in this report are the CIE (Commission International de l'Eclairage) L*a*b* and the Munsell color system. Both systems use three values called tristimulus values to measure each color, which include hue (or color), the chroma (or saturation), and lightness to darkness. In the CIE L*a*b* color system L* represents lightness to darkness from 1 to 100 with 100 being the lightest, a* represents red to green with positive numbers being more red and negative numbers more green, and b* represents yellow to blue with positive numbers being more yellow and negative numbers more blue. In the Munsell system, color measurements are given in the form of hue value/chroma with value representing lightness to darkness. Color measurement values are compared to each other using the ΔE formula1 which calculates the difference between two color measurements. Generally, a ΔE value of less than two represents colors that are difficult for the human eye to differentiate.